Portworx Kubemotion:在OpenShift集群间迁移有状态应用
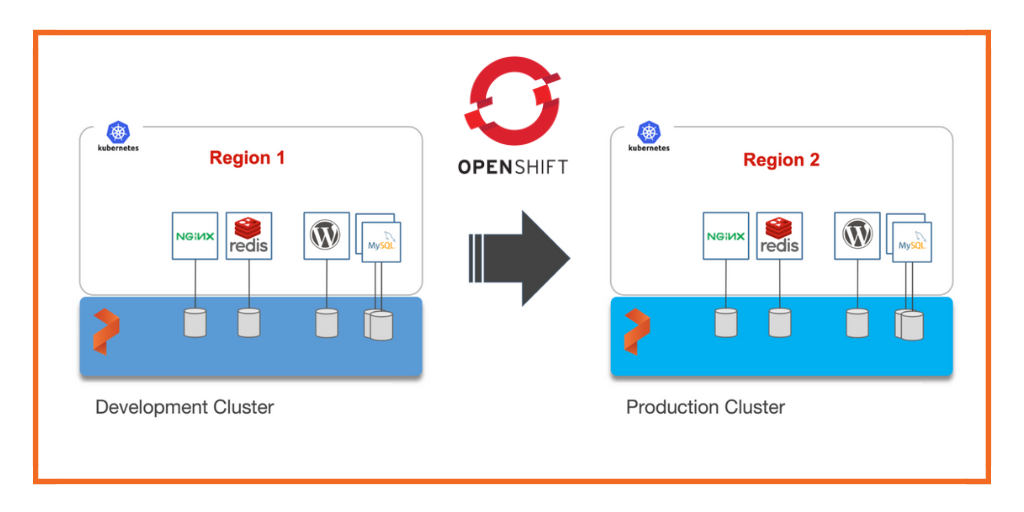
Portworx是一个支撑K8S有状态应用的持久存储和数据管理平台。通过Portworx,它为有状态应用提供了一个单一的数据管理层,从而用户可以在任何底层架构上运行类似数据库这样的有状态应用。Kubemotion是Portworx的核心功能之一,发布在Portworx企业版2.0中。它赋能K8S用户在集群间迁移应用和数据、备份和恢复、以及做蓝绿部署。(https://docs.portworx.com/portworx-install-with-kubernetes/migration/kubemotion/)下面我们介绍如何在红帽OpenShift集群之间,迁移有状态应用的持久卷和相关K8S资源。背景在企业客户中,一个常见的场景是:在一个云区域中运行研发测试环境,而在另一个云区域中运行生产环境。研发测试环境通常会选择距离开发团队比较近,以降低网络延迟,而生产环境则会选择离用户比较近。K8S的无状态应用迁移相对比较容易,但迁移有状态应用是一个挑战。在演示中,我们会在AWS位于美国东部(俄亥俄),和美国西部(俄勒冈)的两个数据中心的Openshift集群间,迁移K8S资源。美国东部区域(俄亥俄)部署的是研发测试环境,美国西部区域(俄勒冈)部署的是生产环境。在系统的测试环节完成后,开发团队将使用Portworx和Kubemotion,把存储卷和应用资源,从研发测试环境,迁移到生产环境中。
研发测试环境和生产环境我们有两个红帽OpenShift集群,分别是研发测试环境、以及生产环境,位于AWS的两个不同区域上,两个环境都安装了最新版本的Portworx集群,并且正在运行。
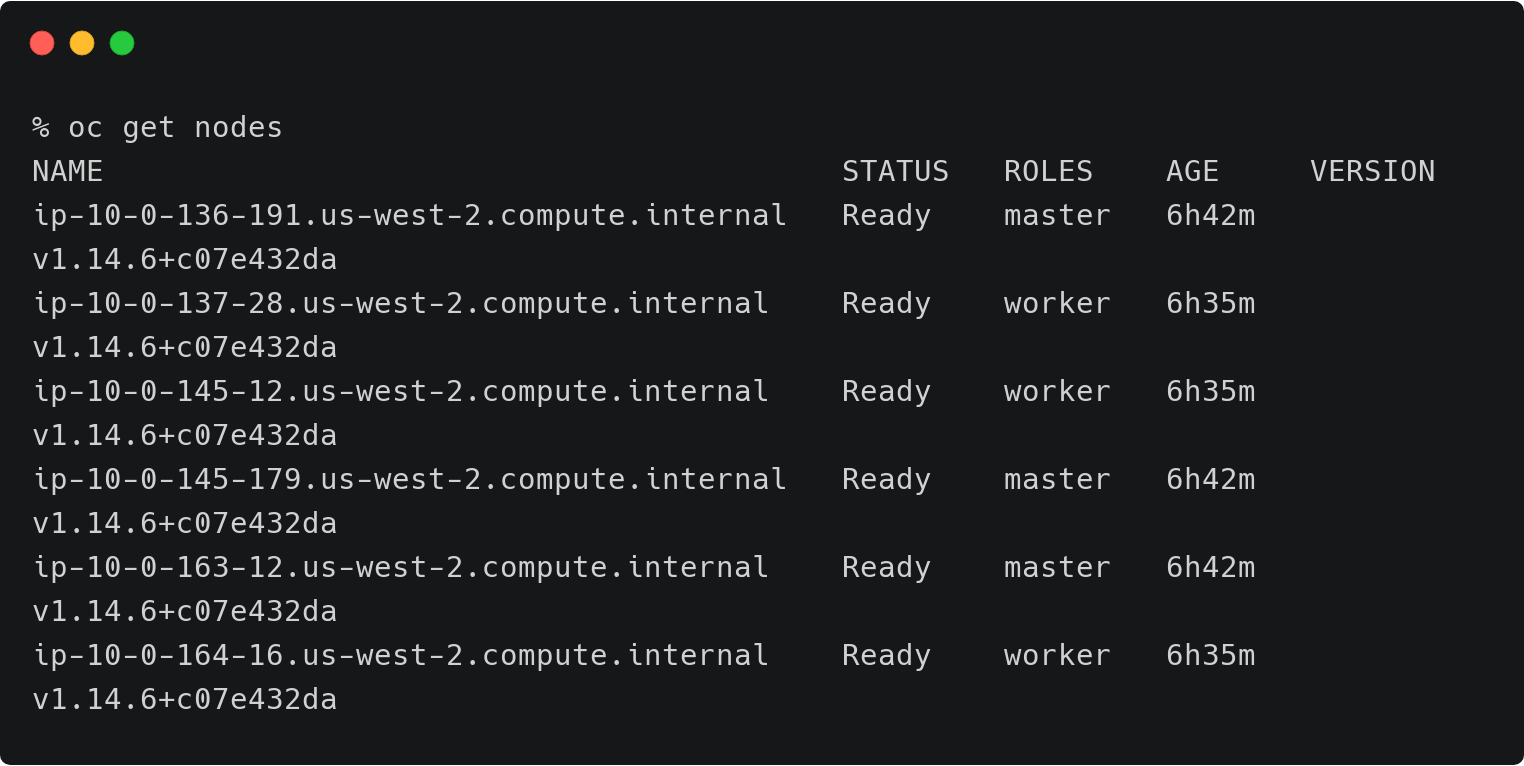
上面的OpenShift集群代表了运行在AWS东部区域(俄亥俄)的研发测试环境。

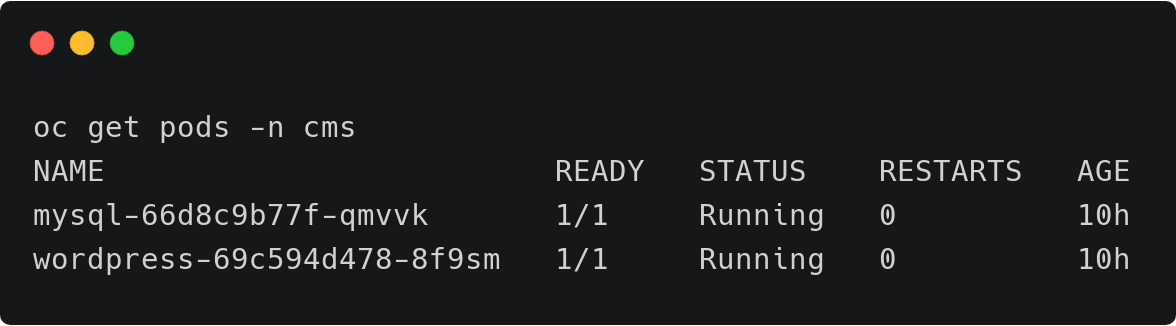
上面的OpenShift集群代表了运行在AWS西部区域(俄勒冈)的生产环境。现在有一个基于LAMP的内容管理系统(CMS)运行在研发测试环境上,我们需要把它迁移到生产环境里。研发测试环境里部署了MySQL和WordPress,它们都位于CMS命名空间里。关于如何在OpenShift上配置高可用的WordPress,可以参考这里的文档。(https://www.portworx.com/run-multi-tenant-ha-wordpress-platform-red-hat-openshift/)
Portworx存储集群支撑了附加在这些Pod上的持久卷。
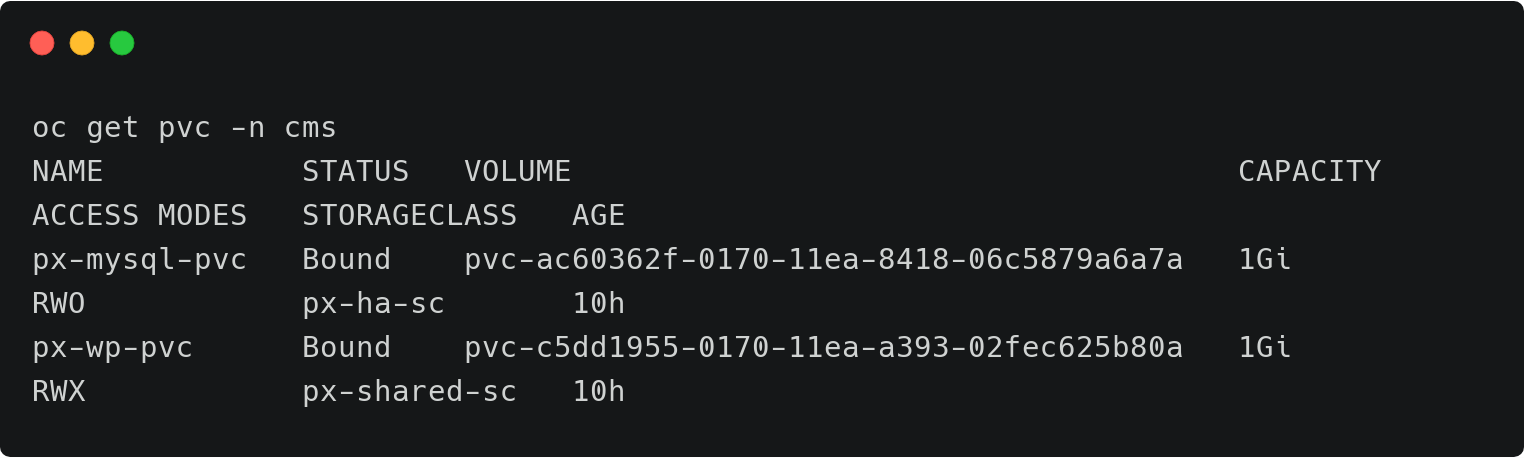
下面的卷附加到了MySQL pod上。
对于WordPress CMS, 有个共享的Portworx卷附加到了Pod上。

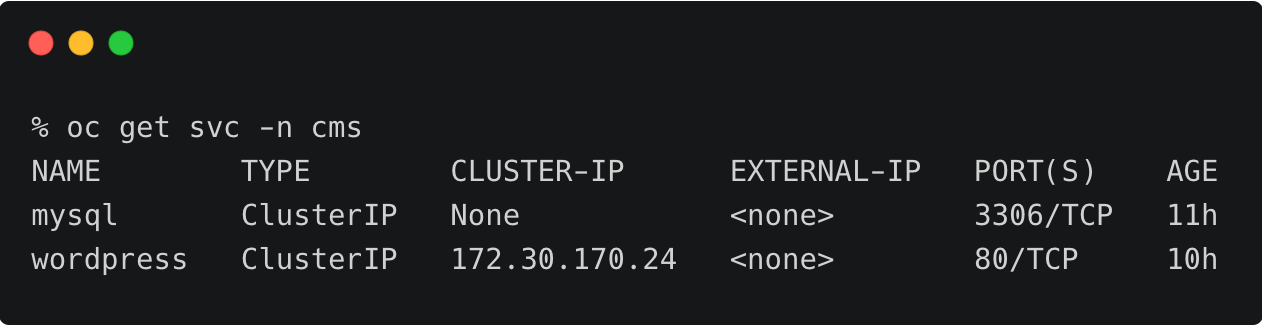
配置好的应用,可以通过WordPress相关的服务来访问。

准备源环境和目标环境在我们迁移之前,我们需要配置源集群和目标集群。按照下面的步骤来准备相关的环境。创建对象存储的访问身份验证我们需要在源集群和目标集群上都创建对象存储的访问身份验证信息。我们需要获得目标集群的UUID,它会被附加在访问身份的名称上。
为了完成这一步,你需要AWS账户的访问密钥和Secret密钥。如果你已经配置好了AWS CLI,可以在这里发现这些密钥。~/.aws/credentials
回到生产环境集群,运行下面的命令来复制UUID。
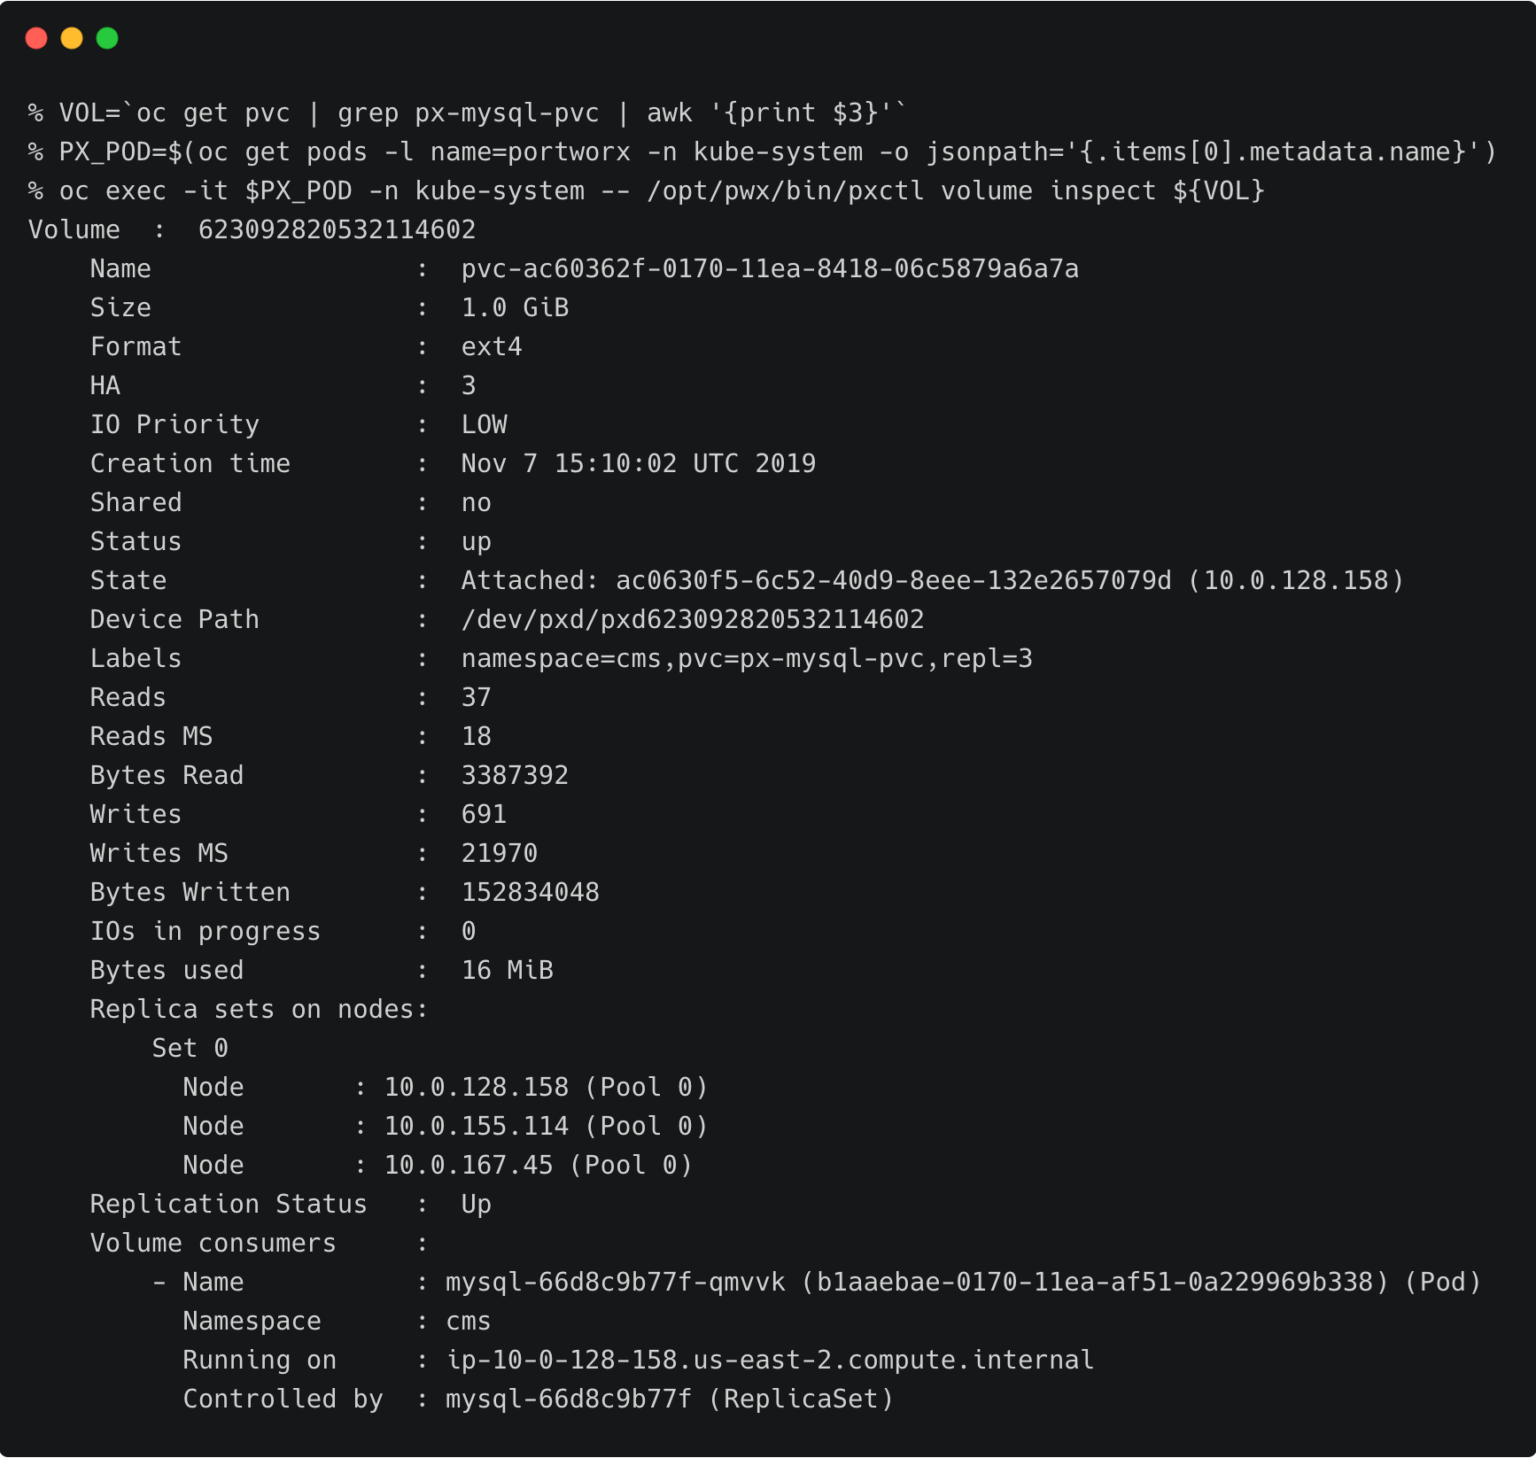
PX_POD=$(oc get pods -l name=portworx -n kube-system -o jsonpath='{.items[0].metadata.name}')oc -n=kube-system exec $PX_POD -- /opt/pwx/bin/pxctl status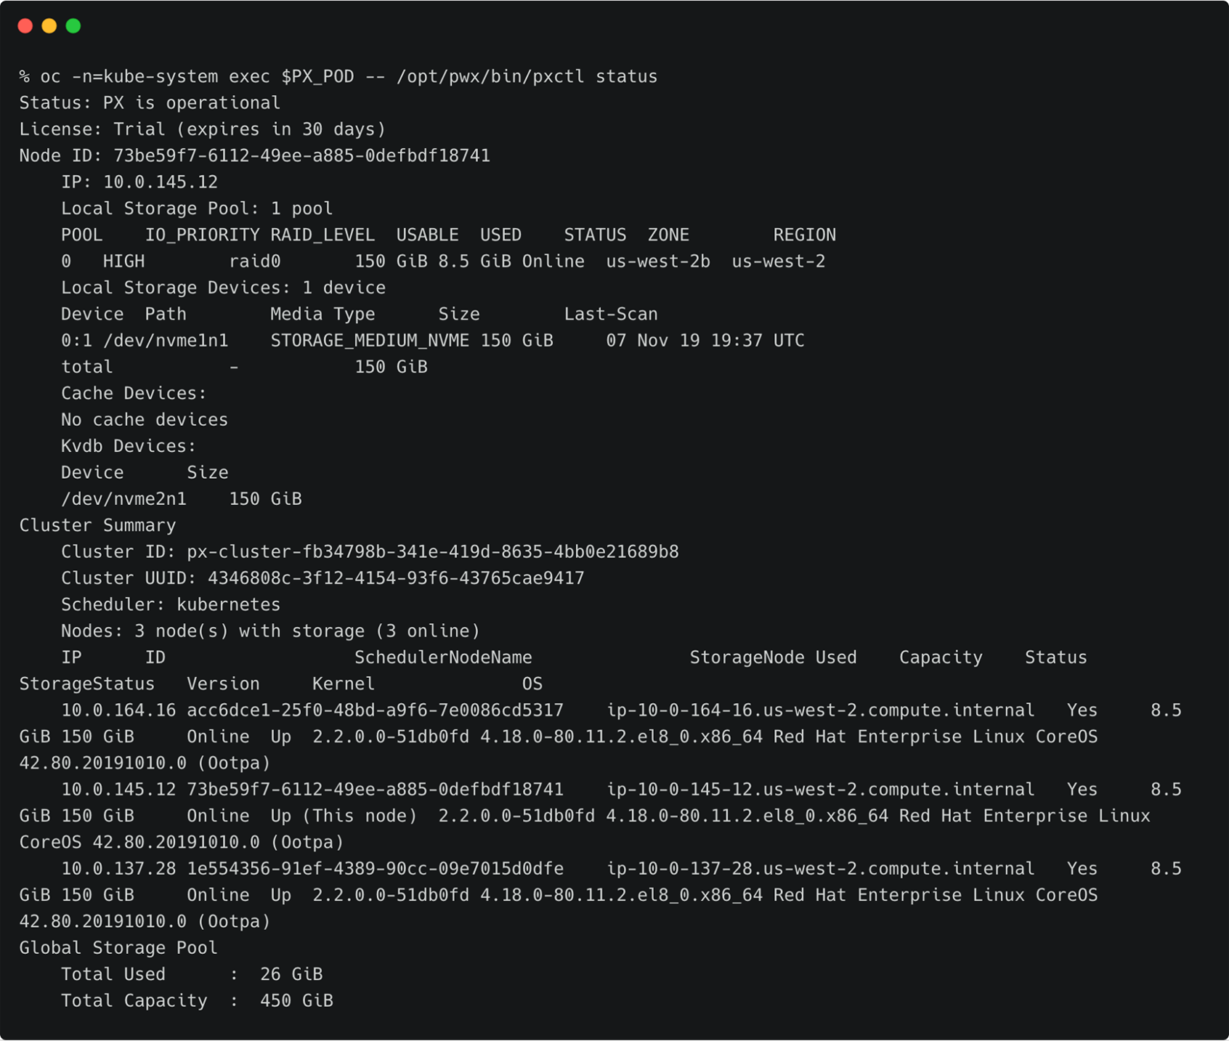
记下集群的UUID,放在一个安全的地方。
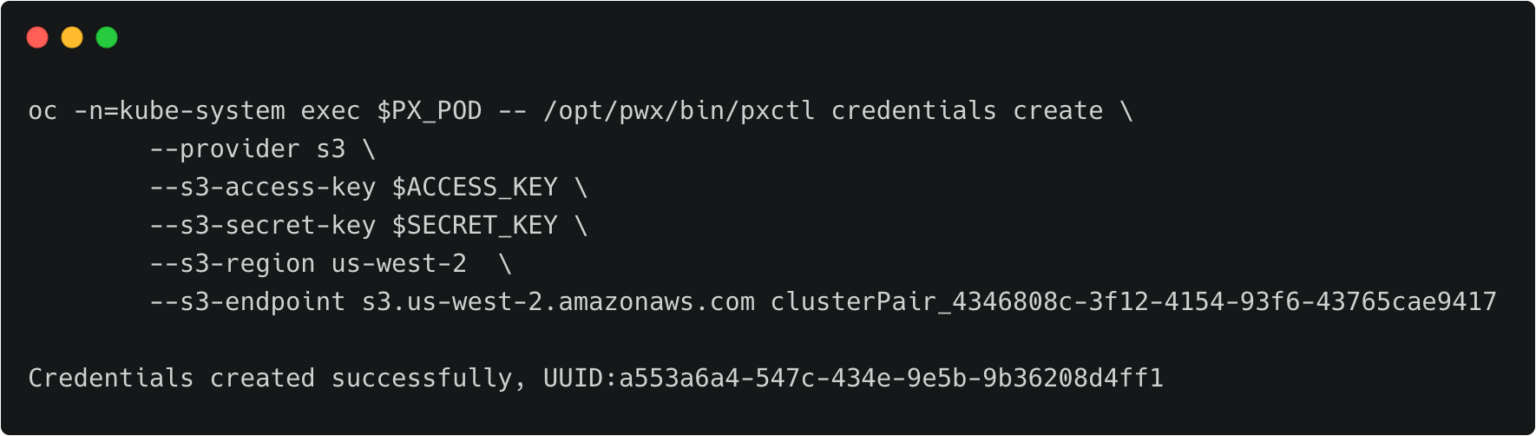
我们在生产环境内,来创建生产环境集群的身份验证信息。
oc -n=kube-system exec $PX_POD -- /opt/pwx/bin/pxctl credentials create \ --provider s3 \ --s3-access-key \ --s3-secret-key \ --s3-region ap-southeast-1 \ --s3-endpoint s3.ap-southeast-1.amazonaws.com clusterPair_c02528e3-30b1-43e7-91c0-c26c111d57b3确保身份验证信息的名称按照这样的格式:‘clusterPair_UUID’。
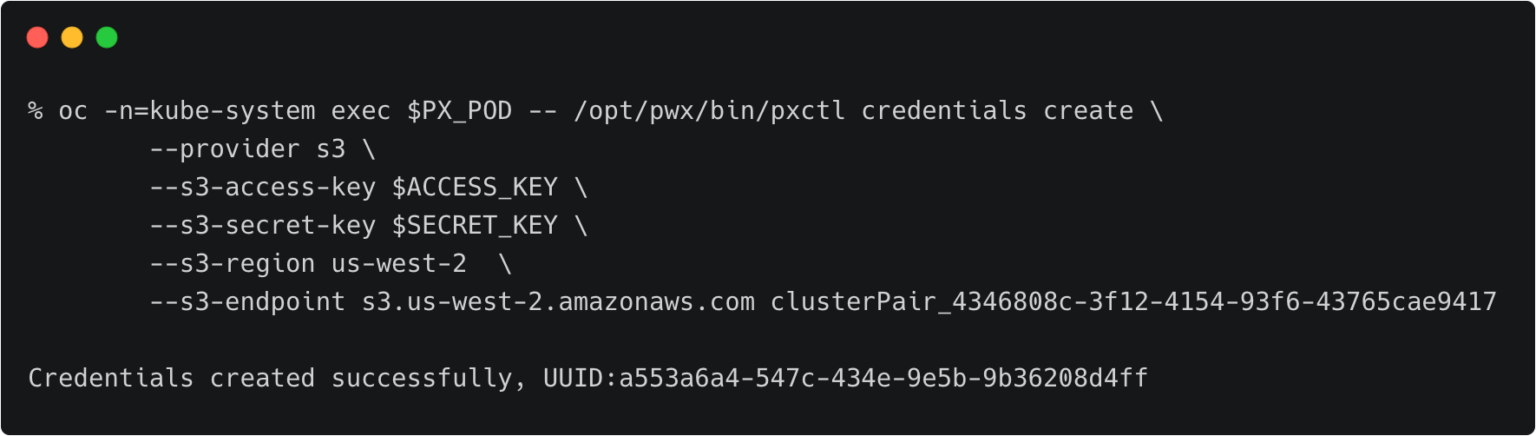
回到研发测试集群,重复操作来创建身份验证信息。
获取目标集群的Token下一步是获取生产环境集群的Token,它会被用来创建集群配对的YAML文件。到生产环境集群,运行下面的命令来访问Token。
PX_POD=$(oc get pods -l name=portworx -n kube-system -o jsonpath='{.items[0].metadata.name}')oc -n=kube-system exec $PX_POD -- /opt/pwx/bin/pxctl cluster token show
记下集群Token,放置在一个安全的地方。为Portworx服务获取负载均衡的端点我们还需要生产环境集群上的,与Portworx服务关联的负载均衡的DNS名称。我们可以通过下面的命令得到。
oc describe svc portworx-service -n kube-system
到这里,你已经准备好下面的数据了:
1. 目标集群的Token
2. 指向Portworx服务的负载均衡的CNAME
创建集群配对参数
我们从生产环境(目标集群)来创建YAML文件。并且把它应用到研发测试环境(源集群)。
确保你在在生产环境中,运行下面的命令。
storkctl generate clusterpair -n cms prodcluster > clusterpair.yaml打开clusterpair.yaml,在选项中增加下面的细节信息。它们反映了目标集群里的负载均衡的IP地址或者DNS名称,以及与目标集群关联的Token。

为Kubemotion进行集群配对
通过为源集群配置配对参数,我们可以把集群进行配对。
我们回到源集群(研发测试环境),来进行集群配对。
oc apply -f clusterpair.yaml
oc get clusterpair -n cms
<pre>oc getclusterpairs</pre> 的输出确认了配对已经成功。
验证配对状态
我们可以通过storkctl CLI来验证配对状态。确保存储的状态,和调度器的状态都是正常,没有错误。
storkctl -n=cms get clusterpair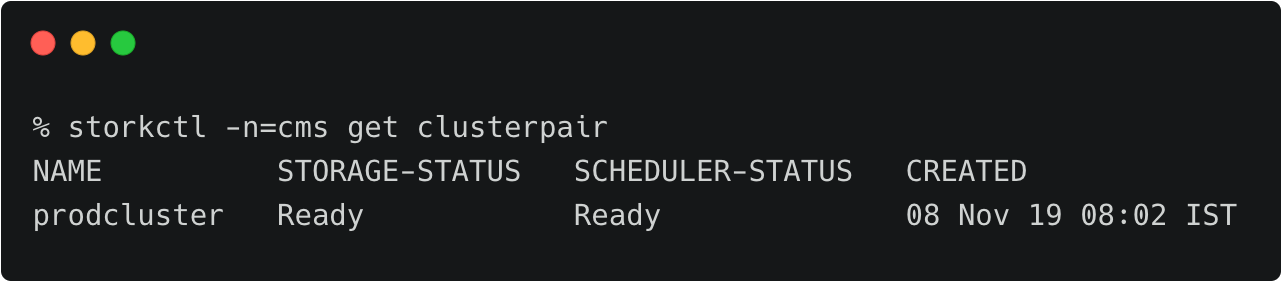
我们验证了,源集群和目标集群已经配对成功。
现在我们开始迁移。
从源集群向目标集群迁移CMS应用
在研发测试环境下,通过下面的步骤开始CMS应用的迁移。
开始迁移
用下面的内容创建一个名为migration.yaml的YAML文件。
apiVersion: stork.libopenstorage.org/v1alpha1
kind: Migrationmetadata:
  name: cmsmigration  namespace: cms
spec:
  # This should be the name of the cluster pair created above
  clusterPair: prodcluster  # If set to false this will migrate only the Portworx volumes. No PVCs, apps, etc will be migrated
  includeResources: true
  # If set to false, the deployments and stateful set replicas will be set to 0 on the destination.
  # There will be an annotation with "stork.openstorage.org/migrationReplicas" on the destinationto store the replica count from the source.
  startApplications: true
  # List of namespaces to migrate
  namespaces:
  - cms
这里包括一些很重要的信息,例如集群配对的名称、迁移中包括的命名空间,需要被迁移的资源类型。
把YAML文件提交到研发测试集群,来开始迁移。
oc apply -f migration.yaml
migration.stork.libopenstorage.org/cmsmigration created
监控迁移的过程
使用storkctl我们来监控迁移的过程。
storkctl get migration -n cms
一旦迁移完成,storkctl 会报告最后迁移到目标集群的卷的数量以及资源。

通过下面的命令,可以得到迁移过程的详细信息。
oc describe migration cmsmigration -n=cms% oc describe migration cmsmigration -n=cmsName:         cmsmigrationNamespace:    cmsLabels:Annotations:  kubectl.kubernetes.io/last-applied-configuration:
                {"apiVersion":"stork.libopenstorage.org/v1alpha1","kind":"Migration","metadata":{"annotations":{},"name":"cmsmigration","namespace":"cms"}...API Version:  stork.libopenstorage.org/v1alpha1Kind:         MigrationMetadata:
  Creation Timestamp:  2019-11-08T02:33:44Z
  Generation:          9
  Resource Version:    346702
  Self Link:           /apis/stork.libopenstorage.org/v1alpha1/namespaces/cms/migrations/cmsmigration
  UID:                 2eeb5d56-01d0-11ea-a393-02fec625b80aSpec:
  Admin Cluster Pair:
  Cluster Pair:        prodcluster  Include Resources:   true
  Include Volumes:     true
  Namespaces:
    cms  Post Exec Rule:
  Pre Exec Rule:
  Selectors:
  Start Applications:  trueStatus:
  Finish Timestamp:  2019-11-08T02:34:56Z
  Resources:
    Group:      core    Kind:       PersistentVolume
    Name:       pvc-ac60362f-0170-11ea-8418-06c5879a6a7a
    Namespace:
    Reason:     Resource migrated successfully    Status:     Successful
    Version:    v1    Group:      core    Kind:       PersistentVolume
    Name:       pvc-c5dd1955-0170-11ea-a393-02fec625b80a
    Namespace:
    Reason:     Resource migrated successfully    Status:     Successful
    Version:    v1    Group:      core    Kind:       Service
    Name:       mysql    Namespace:  cms    Reason:     Resource migrated successfully    Status:     Successful
    Version:    v1    Group:      core    Kind:       Service
    Name:       wordpress    Namespace:  cms    Reason:     Resource migrated successfully    Status:     Successful
    Version:    v1    Group:      core    Kind:       PersistentVolumeClaim
    Name:       px-mysql-pvc    Namespace:  cms    Reason:     Resource migrated successfully    Status:     Successful
    Version:    v1    Group:      core    Kind:       PersistentVolumeClaim
    Name:       px-wp-pvc    Namespace:  cms    Reason:     Resource migrated successfully    Status:     Successful
    Version:    v1    Group:      apps    Kind:       Deployment
    Name:       mysql    Namespace:  cms    Reason:     Resource migrated successfully    Status:     Successful
    Version:    v1    Group:      apps    Kind:       Deployment
    Name:       wordpress    Namespace:  cms    Reason:     Resource migrated successfully    Status:     Successful
    Version:    v1    Group:      route.openshift.io    Kind:       Route
    Name:       wp    Namespace:  cms    Reason:     Resource migrated successfully    Status:     Successful
    Version:    v1  Stage:        Final
  Status:       Successful
  Volumes:
    Namespace:                cms    Persistent Volume Claim:  px-mysql-pvc    Reason:                   Migration successful for volume    Status:                   Successful
    Volume:                   pvc-ac60362f-0170-11ea-8418-06c5879a6a7a
    Namespace:                cms    Persistent Volume Claim:  px-wp-pvc    Reason:                   Migration successful for volume    Status:                   Successful
    Volume:                   pvc-c5dd1955-0170-11ea-a393-02fec625b80aEvents:
  Type    Reason      Age                From   Message
  ----    ------      ----               ----   -------
  Normal  Successful  82s                stork  Volume pvc-ac60362f-0170-11ea-8418-06c5879a6a7a migrated successfully  Normal  Successful  82s                stork  Volume pvc-c5dd1955-0170-11ea-a393-02fec625b80a migrated successfully  Normal  Successful  78s                stork  /v1, Kind=PersistentVolume /pvc-ac60362f-0170-11ea-8418-06c5879a6a7a: Resource migrated successfully  Normal  Successful  78s                stork  /v1, Kind=PersistentVolume /pvc-c5dd1955-0170-11ea-a393-02fec625b80a: Resource migrated successfully  Normal  Successful  78s                stork  /v1, Kind=Service cms/mysql: Resource migrated successfully  Normal  Successful  78s                stork  /v1, Kind=Service cms/wordpress: Resource migrated successfully  Normal  Successful  78s                stork  /v1, Kind=PersistentVolumeClaim cms/px-mysql-pvc: Resource migrated successfully  Normal  Successful  78s                stork  /v1, Kind=PersistentVolumeClaim cms/px-wp-pvc: Resource migrated successfully  Normal  Successful  78s                stork  apps/v1, Kind=Deployment cms/mysql: Resource migrated successfully  Normal  Successful  77s (x2 over 78s)  stork  (combined from similar events): route.openshift.io/v1, Kind=Route cms/wp: Resource migrated successfully
在生产环境上验证迁移
回到生产环境,我们来检查CMS命名空间里的所有资源。
oc get all -n cms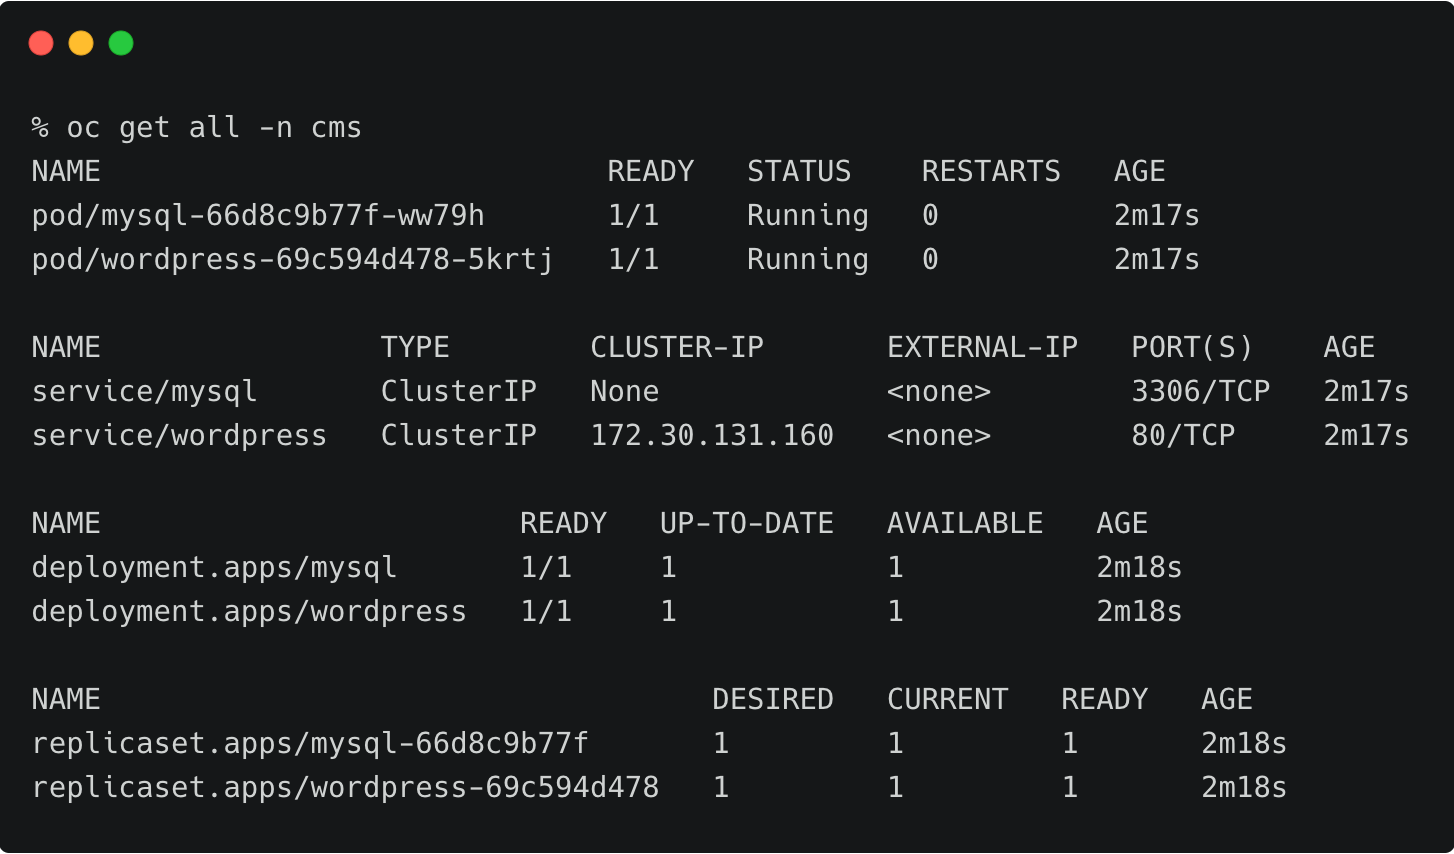
你可以通过为WordPress Pod使用port-forwardding,来访问应用。
小结
Kubemotion为有状态应用增加了迁移功能。它可以在本地环境和云环境之间,以及多云环境之间,无缝的迁移卷。